
Showing posts with label crafts. Show all posts
Showing posts with label crafts. Show all posts
Sunday, December 26, 2010
They were a hit!
The Christmas quilts, that is! Here are Mom and Dad with their quilts on Christmas Eve. Yes, they live in a log cabin, so the quilts work well there. They both loved theirs and they told me that they have curled up with them after we left on Christmas Eve, Christmas Day, and this evening. It made me smile.


Friday, December 24, 2010
Victory!

Victory at last! Dad's quilt is completed and ready to be gifted when we see him for dinner tonight! Whew! I am really glad that this one is ready in the nick of time (I have never run so late in my life). It might be awhile before my hands aren't claws, though since I did the big stitch quilting around the outside edge to stabilize it (there were 4 layers of fabric and 4 layers of batting at the edge).
I hope that all of you have a warm and wonderful Christmas with friends and family!
Wednesday, December 22, 2010
Close, but not complete....
Okay, I have been making lots of progress with Dad's Christmas quilt, but I keep finding more things that either keep me away from finishing up, or that create extra work for me.
But, here is where we stand...
 This little baby is an absolute trooper, but as I don't have a walking foot for it (soon, very soon), I had some trouble with the edge stitching. I used two layers of Warm and Natural batting so that it would be very warm and where the edges all are sewn (yes, I sewed and flipped--don't judge me) there are 4 layers of fabric and 4 layers of batting all crammed up in there together. Can't topstitch without the walking foot because the top layer was getting all puckery. So...

In order to secure that edging and keep it stable, I am hand quilting around the edge, big stitch style with the same crochet cotton that was used in the interior blocks (more on that later). Of course, after 1 and 1/4 edge, my hands turned into claws, so I had to put it down for the evening. But here it is in progress.

This is what my completed corner looks like. It is holding the edge stable and it gives a bit of a rustic touch, which I like for this. My parents live in a log cabin (hence my Mom's log cabin Christmas quilt earlier this year) so rustic and folksy works well for them.

This is the backing fabric that I used. It is part of the extra long, California twin sheet (that my Mom kept for years) that my baby brother took to camp in the summer time. It's a nice plaid and large enough to use a single piece. The plaid is a nice touch.
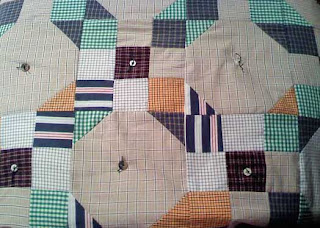
Normally, I really think that tying a quilt is kind of like cheating. Yes, it works for awhile, but it isn't terribly durable compared to good old fashioned quilting. But, hey, it is December 22nd and I have battled multiple broken sewing machines, bronchitis, and the lack of a walking foot to get this far, so I ain't stopping now!
Actually, I saved a bunch of the buttons that came off of the shirts when I processed them. Of course I used bunches to make my button and twig snowflakes, but still had oodles to tie one button in the center of each square in the quilt. I left the little ends sticking up a bit past my surgeon's knot so that it would add to the rustic flair. The buttons don't match in size or even colors, but that makes it look even scrappier. The more I work with it, the more I just know that it suits Dad perfectly. Tomorrow I will work on it further and with any luck finish it and start cleaning my horribly neglectedpig sty house for the festivities to begin.
I hope that everyone who reads this post has the opportunity to celebrate Christmas (or the holiday of your choice) with the ones you love. Can't wait to see what I we can get into quilt-wise for 2011!
But, here is where we stand...


In order to secure that edging and keep it stable, I am hand quilting around the edge, big stitch style with the same crochet cotton that was used in the interior blocks (more on that later). Of course, after 1 and 1/4 edge, my hands turned into claws, so I had to put it down for the evening. But here it is in progress.

This is what my completed corner looks like. It is holding the edge stable and it gives a bit of a rustic touch, which I like for this. My parents live in a log cabin (hence my Mom's log cabin Christmas quilt earlier this year) so rustic and folksy works well for them.

This is the backing fabric that I used. It is part of the extra long, California twin sheet (that my Mom kept for years) that my baby brother took to camp in the summer time. It's a nice plaid and large enough to use a single piece. The plaid is a nice touch.

Normally, I really think that tying a quilt is kind of like cheating. Yes, it works for awhile, but it isn't terribly durable compared to good old fashioned quilting. But, hey, it is December 22nd and I have battled multiple broken sewing machines, bronchitis, and the lack of a walking foot to get this far, so I ain't stopping now!
Actually, I saved a bunch of the buttons that came off of the shirts when I processed them. Of course I used bunches to make my button and twig snowflakes, but still had oodles to tie one button in the center of each square in the quilt. I left the little ends sticking up a bit past my surgeon's knot so that it would add to the rustic flair. The buttons don't match in size or even colors, but that makes it look even scrappier. The more I work with it, the more I just know that it suits Dad perfectly. Tomorrow I will work on it further and with any luck finish it and start cleaning my horribly neglected
I hope that everyone who reads this post has the opportunity to celebrate Christmas (or the holiday of your choice) with the ones you love. Can't wait to see what
Monday, December 20, 2010
Finally! Some Progress (and Pictures)!
Ta-daaa! Here it is, the majority of my Dad's Christmas quilt.

For a quilt that is mostly navy blue and beige, it really is "reading" as green. It's kind of funny, but that will definitely affect what I choose for my borders. I can either play up the green or play it down with navy or red. Choices, choices...
Here it is hanging on my cheater "design wall" as I have been calling it lately. I am looking at it and pondering which of my new thrifted shirts will become the first border. The original pattern calls for a piano key border, which is absolutely gorgeous, but I am running so short on time, it may prove very unpractical!
Readers (both of you!) may remember that I had a very unfortunate situation occur with my first quilt ever made from vintage shirts. It was to be a baby quilt for the new honorary grandson, but it disintegrated in the wash. I disintegrated when I found it. Fortunately, the baby's living great grandmother made him a quilt, so I didn't feel quite so bad. But, I am definitely making him a "big boy" quilt for a twin bed. Anyways....
It was a big step for me to even consider making another quilt out of shirt material after that. But, I have a new sewing machine and my old, second hand machine may have been the culprit, so I am stepping out on faith here!

Hubby who originally hated this pattern when I first showed it to him, really seems to like it now that he sees it in person. He keeps telling me that he really likes the "ring" in each block. It's not really in each block, it is kind of like an optical illusion thing. The "ring" is formed by a secondary pattern when the blocks are butted up against each other. Nonetheless, it does give a lot of interest. Isn't it funny how secondary patterns emerge with some quilts? When I first looked at this one, it almost looked like an exploding star to me, but hubby immediately focused in on the rings.

I cropped this photo to show the actual block unit that is used to create the quilt top. The color placement in my version is not quite the same as in the original version (due to my error) but I really like that it looks extra scrappy this way.
I am very pleased with how this is turning out so far. Now, I am off to dissect a few shirts and start auditioning borders! Can't wait!
Friday, December 17, 2010
A little bit of progress

Life is a little wonky, right? Especially on bronchitis meds! LOL!
Right now, all of the little 9-patch numbers are done and I have done the first 12 of the snowball blocks. 12 more snowballs to go and then we can start assembling and making decisions about borders and backings. I will be very much relieved when this final gift is completed.
My Mom tells me that Dad, "sits around and shivers like a chihuahua!" Great visual. So, I figure that he really needs a quilt. He is diabetic and is feeling the cold more these days. Mom, however, still has hot flashes and thinks that the proverbial "Nanook of the North" is sweating in his igloo! Now, I hope that Dad will get to cuddle under his very own quilt, made of guy fabrics, and stay completely and totally warm!
We can only hope!
Sunday, December 12, 2010
We got snow for the Snowflake Event...
Well, kind of. The kids were calling out excitedly, "it's snow, it's snow!" So, I opened the front door to look through our storm door and noticed that the "snow" was bouncing on our wooden steps and small landing.
Snow shouldn't bounce. I have lived all of my life in Georgia, but I was raised by Yankee parents, so I know things like the fact that snow doesn't bounce upon impact.
Hubby thought this was funny and set out with DS12 to determine if this wasn't snow, what it was. Nothing like a teachable moment in this house! They went out and inspected the icy things and determined that the centers are white with a clear outer ring. This indicates that there was a bit of real snow in the center and ice formed around it while it was in descent. In meteorological terms, this is graupel, a German word for snow surrounded by ice. I thought that in honor of the Snowflake Event, that I would make note of this. Those poor little snowflakes tried to come to Georgia, but they got ganged up on by ice crystals. So sad.
However, we weren't depending on Mother Nature for our snow. Here are our homemade snowflakes:

I made this little snowflake (no pattern, just having fun) to hang in the little window that is high up on our front door.

The boys and I made the paper snowflakes that make up our mantle garland this year. It was really fun. They liked it, but didn't have much patience for doing the more intricate designs. These were all done free-form. The quilted mantle scarf was made last year. The "Better Not Pout" sign was made by my mother and given to me to post conspicuously for the boys. The red candles are real wax, but battery operated and really flicker. The small, china cups hold tea lights (when my tea lights are used up, I will get battery operated ones to use). The red candle on the left was a recent gift.

This is our fireplace. I really like the warm, golden glow that the candles cast over the decorations. It just looks warm and cozy to me. The candle lanterns on the hearth were given to us one year full of cookies! We have used them with candles in them every year since. The lanterns help to keep the kitties from playing with the flickering flames (silly cats!).

Here are a close up of my latest decorations. They are snowflakes made up of twigs and buttons, painted white and stuck to the rocks with a (gasp!) glue gun. The glue holds them securely but can be popped off of the rocks fairly easily. I like that they add a bit of a rustic texture that goes well with the rock fireplace surround. I found the tutorial to make these here. I really enjoyed using items that were readily available (buttons from repurposed shirts, glue gun, twigs, white craft paint). It really cost next to nothing, but looks so festive. I think these will stay until spring.
Many special thanks to The Pleasant Times blog for hosting this Snowflake Event. The entries that I have seen so far are stunning and inventive! I hope you have enjoyed seeing my take on snowflakes. Please stop back by anytime!
Wednesday, December 8, 2010
Snowflake Event!

Isn't this button adorable? I am so excited about the Snowflake Event that begins next week over at The Pleasant Times blog. For some reason, the entire button isn't showing but just the graphic. That's okay, you can check them all out at the blog.
I can't wait to see what everyone comes up with.
Friday, December 3, 2010
First Project with the New Machine!

Here it is! It is the first official sewing project on the new machine! You didn't think I would wait long to do a little something, did you???
This is a project that I found on dollarstorecrafts.com. These will go into my gift baskets for family members. I did get the kitchen towel and potholders at Dollar Tree. I am making two of these for a total cost of $1.50 per gift. Woo Hoo!
Thursday, December 2, 2010
This is just too stinkin' cute!
You just HAVE to check out the quaint, little snowflakes on this blog. She shared a tutorial on how to make them and everything. I can see so many ideas from this basic tutorial. I can't wait to get started! They don't look expensive to make at all, either!
Plus, remember the Snowflake Event beginning the week of December 12th at The Pleasant Times blog! This is just going to be so much fun!
I guess I am going through a bit of the winter doldrums here, but I just haven't been feeling like myself lately. I am not keeping up with things in my life. I just feel icky and want to sleep--like I am fighting off a cold or something. So, since these snowflakes are getting me excited, I am going to go with it and really indulge! Maybe it can help me shake it up a bit and feel a little better. Let's hope so!
Tuesday, November 30, 2010
Won't You Join Us?

I ran across something really fun out in blogland! I follow a wonderful little blog called, The Pleasant Times, which has many crafts, edifying articles, and just nice stuff. It's kind of like a blog about Simple Living with an emphasis on appreciating beauty.

Today, I was reading the latest post and they are having a Snowflake Event during the week of December 12th! It's a celebration of all things snowflake! There are beautiful paper snowflakes on their site and some patterns, links to other patterns, etc. You can showcase anything with snowflakes on your blog: sewing, quilts, stencils, rubber stamping, folded paper, embroidery--really just anything at all.
Most of these crafts are really inexpensive, but gorgeous! Imagine snowflakes of all sizes cut from left over winter themed scrapbook papers. The new fine glitter could be great, too.
For those families with loads of kiddos (or nearby friends) how about having the kids lie down on the ground and make the shape of a snowflake all together. What a fun photo that could be!
My boys and I discussed it and we will be cutting out paper snowflakes and talking about crystalline structures during our home school science time. Hmmm. I think I will also sneak in a bit about properties of water (why it expands during freezing) and 60 degree triangles and bonds.
This is not about competition, money, or anything else. It's just a compilation of links from folks who will all be celebrating the season together with snowflake themed crafts, art, etc. No pressure!

But, the best part for me is that reading the blog post reminded me of making paper snowflakes with my science students in public school to go along with atomic and crystalline structures. We decorated my classroom with loads of snowflakes and it was wonderful! It's one of my favorite memories from that time in my life.
So...long story short, won't you please join us in making some snowflake crafts and sharing in a bit of frugal Christmas joy? I'd love to see yours!
Hmmm. Ideas....

Okay, I am looking for a really good idea for a gift for our wonderful math tutor. She is a retired special education teacher who has taught kids with learning disabilities and autism her entire career. She has been such a blessing in our lives. DS14 (my Aspie) has really grown so much while working with her.
When she started working with us in May of this year, my kiddo was doing marginal 1st grade math. He is now doing basic algebra and geometry. She has to present it in ways that make sense to him (which I just don't know how to do) and he is thriving! She is definitely an answer to prayer.
I'd love to make her something to show appreciation. I am trying to be mindful of both time and money. I am not sure when the sewing machine will be arriving.
In a perfect world, a lap quilt would be in order, but I am not sure I will have time to get that completed this time around. I was thinking of potholders (can't everyone use potholders?) or a candle mat, maybe with one of the new, battery operated candles (love those because of my cats. The tutor has a cat also). Hmmm.

I got this photo from a wonderful tutorial at http://33shadesofgreen.blogspot.com/2010/02/amy-butler-quilted-potholder.html.
Any ideas that you would be willing to share? Please?????
Woo Hoo! Victory!

My log cabin quilt (Christmas gift for someone special) made it out of the laundry intact. Whew!
I am quite relieved!
Monday, November 29, 2010
575 Posts and a new finish!
It's hard to believe that this is my 575th post! When I started this blog, I wasn't sure if I would have much to say or whether anyone would want to read it. Looks like I have kept on writing and a few folks continue to read, so it's a good thing! It's been a good outlet for me and a way to connect with others with similar interests. So, for you who read this blog, thank you!

I have been kind of restless today, possibly because I am trying to decide what I want to do, gift wise, while waiting on my sewing machine to arrive. I guess it has made me a tad more productive. I managed to get the binding on a quilt that I had quilted as a QAYG and had been waiting for the binding to go on. I had used a friend's machine to do the seaming and was folding it to the back and stitching it down. Right as I got to the final foot or so on the last side, my kitty, Natasha, decided that the quilt looked good enough for her and she just hopped on up!
Yep, my quilts are kitty approved! Now I just have to get brave enough to wash it and pray that it stays together (unlike the shirting quilt). Wish me luck!
Friday, November 26, 2010
Blessings!

I started my home business and it is growing. It is slowly growing and getting stronger by the day. I have no doubt that it will eventually be able to replace my earlier income.
But, I have to admit horrendous frustration when my sewing machine died. I inherited a couple of older ones that died soon after also. Hubby is great at being able to do minor maintenance on them and he kept me going for months longer than I should have been able to go. But, he can only do so much!
I depend on my sewing machine to do some repairs, make things for around the home, make great gifts without spending loads of cash, quilting, and just general therapy for me. I love to make things. It makes me happy. It saves me money and I enjoy it!
When the shirting baby quilt fell apart because of faulty stitching, I knew that my machine sewing days were nearing a close. My mom and a friend allowed me to finish up a Christmas gift on their machines, but I had to re-think oodles of gifts because I couldn't do the sewing projects that I had planned.
But, Black Friday came and my hubby blessed me tremendously. I had an online coupon to a site and they put a sewing machine on deep markdown. It isn't fancy and it wasn't a pricey machine to begin with, but it will serve my needs well. We were able to pick it up for less than 50% of the original price with free shipping, the coupon, and the sale in progress. It's not my dream machine and I will continue to save a little here and there to eventually get that one, but it is a Consumer Reports Best Buy rated machine.
I am SO grateful for my hubby and this blessing in my life. I can't wait for it to arrive. I am going to take amazing care of this little baby! And yes, the photo above is of the machine that I am getting. Nothing to brag about, perhaps, but it means the world to my little, creative heart!
Sunday, October 31, 2010
Some progress

Well, I was finally forced to make a decision regarding the baby quilt that I am making. Mostly, the decisions were made by realizing that while I had started in plenty of time to leisurely work on this quilt, I had gotten busy with other things and didn't realize that the shower is NEXT SATURDAY!!!
So, with time short and money shorter, I had to just go with a plan that would allow me to use fabrics that I already had and that I could sew up in very little time.
The photo doesn't really show it well, but the red outer border is the exact same fabric as the red star points. It should finish up to a 40 inch square. I think I might have enough of the blue check from the star points for the binding. But, at this point, it is going to be bound with whatever I have that will work. I am not against a scrappy binding.
As for the backing, I will have to start working on it tomorrow evening. I will be using various shirting materials I have. The mom-to-be had a color scheme in mind for the top (she has no idea what I did with her color choices, though), but the backing may add in other colors out of necessity. I plan to piece together scraps from my shirting fabrics to make a scrappy back. I do have a vintage sheet that is a red, white, and blue plaid that I could use for a single fabric back.
I kind of had it in my head that since this was my first quilt from shirt fabrics that it would be entirely out of shirt fabrics. I am not sure why it matters, but....
After that, I will be seeing what I have in the batting department. I may be piecing some batting together to get a piece big enough to work with. At least I feel like I haven't been wasteful at all with this quilt.
I did plan on making my dad a quilt for Christmas out of the shirt fabrics, and if I am going to do that, I will have to get started pretty darn quick! Otherwise, I won't get it finished in time.
Saturday, October 30, 2010
Frugal, by necessity or choice!
Although the politicians say otherwise, I know different. At least in my area of the country (the deep South, specifically, Georgia) we are still being hard hit by this economy. Georgia has lost tons of jobs and I know lots of people who are under-employed or going through a prolonged job search. Raises are non existent for most folks and pay cuts are the norm.
That being said, just about everyone I know is hunkering down and trying to figure out how they can hold it together through Christmas. I am certainly no exception.
Here are some of the things that I do to try and stretch my money a little bit farther.
1. Hang clothes to dry. Our dryer is on its last leg and I only use it for things that really need to be dried. Things that have to be ironed, for example. I couldn't care less if my towels are a little scratchy. Dermatologists tell us to exfoliate, don't they?

2. Home hair cuts. I do the haircuts for both of our boys and get compliments on how nice and neat they look. Hubby isn't brave enough, yet, but someone told him that he should do his hair like my son's hair. Loved that! I use a good set of clippers that hubby found with guide combs (more than paid for itsself, by the way). Even in the beginning, the kids didn't look bad. Now, I am getting good at it. I even cut my own hair. Yes, it sounds like I am super-talented. 8 or 9 years ago, I had unexplained hair loss until I started wearing wigs. I get them on sale and look for trendy/modern cuts. They look great. I buzz cut what is left of my own hair. Otherwise, I would have a stringy comb over thing happening.
3. Cook at home. This is not an easy one for me. I am not a good cook. I am best preparing candies and baking things that would make your cardiologist's head spin. But, as my doctor put me on a diet where I have lost 50 lbs., I can't eat like that. My menus are uninspired, but nutritious. Hubby is a better cook, but he isn't here to do the cooking, except on weekends. I love weekends.
4. Canning or Freezing. You can save a lot of money putting food up. I get windfall pears every year from my trees at my parent's house. They really don't use them for anything, they like that they attract deer. I will cook and can them. Yes, it's work, but that work will keep us full and happy through the winter. Canned goods in a nice basket make a great gift that I have used for many a Christmas! Family packs of meat or surplus of veggies in season can be put away inexpensively. Think sweet potatoes cooked and canned in November. Think green beans in July. Think pumpkins--NOW! If you like the seeds, dry and roast them.
5. Learn to sew. Even if you make crafty gifts or simple curtains and repairs, you can save a bundle and add a little bit of self-sufficiency to your skill list.
6. Crochet or knit. Make scarves for gifts or hats for the homeless shelter. Yarn can be found at thrift stores or even cheaply at Wal Mart. You can make things more special than you can buy them. Make your own dish cloths. If you take good care of them, they will last absolutely forever. They also make a cute gift.
7. Turn off the cable or satellite dish. We did (out of necessity) and until the new season of Dr. Who starts, I won't actually care. The kids watch shows on hulu.com and my oldest has discovered the old Superman movies and Alf! I really did miss two short PBS specials on Sapelo Island and the Okefenokee swamp that I would have liked to have seen, but I am not all that heartbroken about it.
8. Entertain yourselves at home. Rent redbox movies or trade movies that you own with a friend to see something new. Hubby salvedged the bottom bowl from an old smoker that had died and put it up on some rocks and made an impromptu fire pit. We have had numerous marshmallow and wienie roasts and they are fun! We even did this with guests who were visiting and they had a great time. We burned deadfall wood from our property. Yes, we did spring for marshmallows, graham crackers, and chocolate (and hot dogs) but it's still cheap fun!
Anyway, if you are being hard hit by the economy, you are not alone. Just use this time to build up some frugal skills.
Tuesday, October 19, 2010
Work in Progress

I just have to decide how I want to finish this out. I know that I will have borders around the edges, but I am not sure how many and of which fabrics. I am currently wondering if an nice red border surrounded by pieced scrappy bits of red, tan, and blue fabrics, surrounded by another dark navy border would look.
Hmmm. Maybe I should leave the scrappy to the binding. I'd love it if YOU, my wonderful and glorious readers would chime in with an opinion or two.....or thirty! I know that folks do occasionally check out my blog, so I want to know what everyone thinks would look best.
Tuesday, October 12, 2010
Baby steps...baby steps
Well, in between out of town guests (love them!) and sick kids (allergies backed up sinuses and now kiddos have infections and ear infections, too), I managed to get a little bit of quilting in.

Thanks to a friend who gave me an older sewing machine that has an awesome straight stitch (but no zig-zag), I am back in business. The star on the left is machine pieced this evening. The one on the right is hand pieced. I love them both. Right now, I am thinking of keeping the hand pieced block and making a wall hanging out of it. I love the hand pieced block, but I am afraid that the machine pieced one might stand up to various washings for a baby's use a little better.
But, I absolutely love having both blocks hanging up to view them. I am using old, discarded, I mean vintage shirting fabrics for these. It's soft and masculine. It is the kind of thing that I would have hung up in my kiddo's rooms for years since it isn't kiddie type fabrics
Now, I have to machine piece three more blocks and borders. We are taking a break from school right now, so it's a good thing that I have suddenly been gifted with a machine. God is SO good to me!
Wednesday, October 6, 2010
Port-a-bil-ity!

When I looked at the information in the book on hand piecing (great photos, by the way), I realized that I would need to keep a few supplies together so that I could work anywhere. Here are the contents of my new portable sewing kit that I made up. It includes, a mini tape measure, sharp scissors, a rubber coated thimble, YLI Select hand quilting thread in white (needle stuck in top for photo), needle compact (that I will refill), needle threader, and about 8 straight pins. Now, I just needed a way to keep it all together.


Here it is, all set up in working order. There are two strong magnets hot glued to the lid. One holds my needle that I am currently using so that it won't get lost in the contents. The other holds my few straight pins. Hubby kept the magnets out of an old cell phone case. They are really strong to be so small. Hubby scratched up the lid a bit so that my glue would make a good bond with the magnets.
It is the size of a, well, a sandwich actually to carry around. I keep my current block in progress in a ziplock type (but cheaper) plastic bag to keep all of my pieces together. I can throw it in my purse, or a tote bag.
It's pretty convenient. Today, I sewed two seams while waiting for DS14 in the orthodontist's office. He popped a bracket off and we needed to get it fixed. I also stitched a bit while the kids were working during homeschool time. I imagine that if I get a used to carrying this around, I will find lots of small amounts of time where I can do a bit. Sounds like it could add up to some serious progress to me!
A Small Victory....

The center blue is a tiny blue and white check, the star points are navy with various blue stripes, and the back ground is a pale blue and yellow windowpane on white. This is the first block in the baby quilt that I am beginning for a very dear friend. I am so excited for her as I know that she will be an awesome mom!

Here is the truth of the situation.....the back of the block. This is where all mistakes will show up. If you look closely you will discover that I am NOT a very good seamstress by hand. But, that part will be hidden and more importantly, this star has POINTS, yes, real points.
I have impressed myself to no end! LOL!
Subscribe to:
Posts (Atom)